What is Docker?
Destructuring the key concepts of containerization with Docker.
Headstart
Starting to learn something new, maybe it is a framework, a tool, or a new programming language can be exciting. What matters is what created the most urgency to create that technology in the very first place. This is why we'll look into some problems that ended up with people using docker!
Problems solved by docker -
During early times, developers used to deploy one application per server. Now imagine thousands of people trying to access that application. This will certainly increase the server load.
Would you think it is feasible to buy or rent a thousand servers? Obviously not. It will lead to increased cost and hardware usability.

VMware solved this problem by allowing multiple applications to run on operating systems (virtual machines) which in turn were running on a host machine.
Imagine scaling it to 100 VMs. This leads us to the virtualization problem -> VMs take extra storage space, hardware requirements CPUs, RAM, and much time to boot up.
The most popular "IT WORKS ON MY MACHINE" problem - Developers used to create applications that were absolutely running fine on their system. But guess what? When those applications were sent to other developers' systems to review, they crashed. There was a dependency management problem like packages, modules had to be downloaded separately.

It became a tedious task to set up an open-source project on your system. Let's say you are working with a team of developers, building an application. So, you might wanna download some services like nodejs, redis, or PostgreSQL that are needed to build that app. Now every dev. on your team needs to install and configure those services on their local system to work collaboratively.
With challenging times, software developers wanted to come up with a solution that met the following demands -
I don't want to install a new OS.
I want something that doesn't require a dedicated system.
I want a machine that runs hundreds of applications without downtime, scalability issues, or server load crashes.
This is where containers come in.
Containers
A container is a small, stand-alone software package that contains an application and its dependencies. Containers offer a uniform and portable environment for installing and running applications across several computer environments, including development, testing, and production.
To understand containers in a much better way, let's know the differences between bare metal, a virtual machine, and a container.
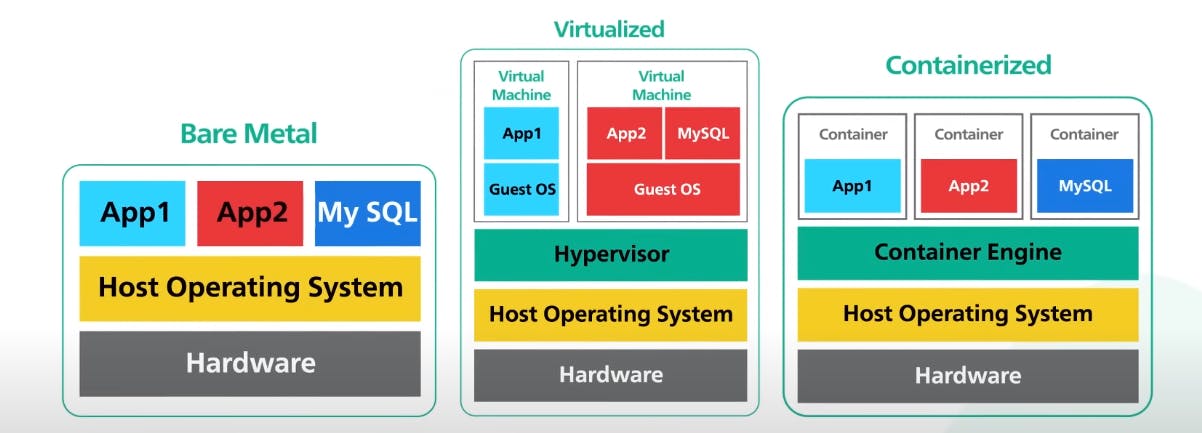
(the above image has been taken from ByteByteGo)
Bare metal -
Bare metal is a physical server that runs one host operating system on top of a hardware machine. The applications run directly on the underlying system without any abstraction. This was the traditional way of storing and running applications in early servers.
Virtual machine -
Whereas in the case of a virtualized machine, we have a hypervisor more like a virtual machine manager. It creates virtualized instances of an operating system called guest OS. So basically, the virtual machines have their own operating system that allows multiple applications to run on them. They also contain a set of libraries and binaries that are required to run those applications. In doing so, it occupies a lot more space than the application.
They do not rely on the host operating system. One VM is isolated from another. These VMs have no idea about the operations being carried out in other VMs. These VMs virtualize hardware requirements of the host OS and make them available for themselves.
Container -
A container on the other hand is a lightweight version of virtualization. Instead of the hypervisor, we have a container engine on the top of the host operating system. This engine creates multiple containers housing applications to run within them. These containers encapsulate packages, dependencies, runtime, and applications and isolate them from the other containers. A container gives faster performance than a virtual machine since it occupies less space. The containers virtualize the operating system.
Because of its encapsulation, these containers become portable so that they can run anywhere irrespective of hardware and software requirements of a system. They are scalable and require less hardware resources than a virtual machine. Containers enable rapid application deployment, scalability, and optimal resource utilization.
Now that we know what a container is, let's jump into docker.
Finally, what is Docker?
Docker is a container allowing us to package applications, dependencies, and configurations. It makes it easy to build, test, deploy, and scale the applications in an isolated environment. It gives us a way to write down the instructions on how the application looks like, along with its dependencies in a docker file. This file is used to build a docker image. Now, one can create as many containers using that docker image.

Well, apart from learning of its container properties, why docker?
Docker images may be built, tested, and deployed as part of the continuous integration/continuous delivery process, ensuring consistent and dependable releases.
By specifying the application's infrastructure requirements in code, known as Dockerfiles or Docker Compose files, the infrastructure setup becomes reproducible, version-controlled, and readily shared among team members.
Docker enables simple rollbacks by simply redeploying an earlier version of the container image, offering a safety net in the event of problems or flaws.
Docker provides orchestration technologies such as Docker Swarm or Kubernetes to manage and scale containerized workloads as needed.
Docker Architecture
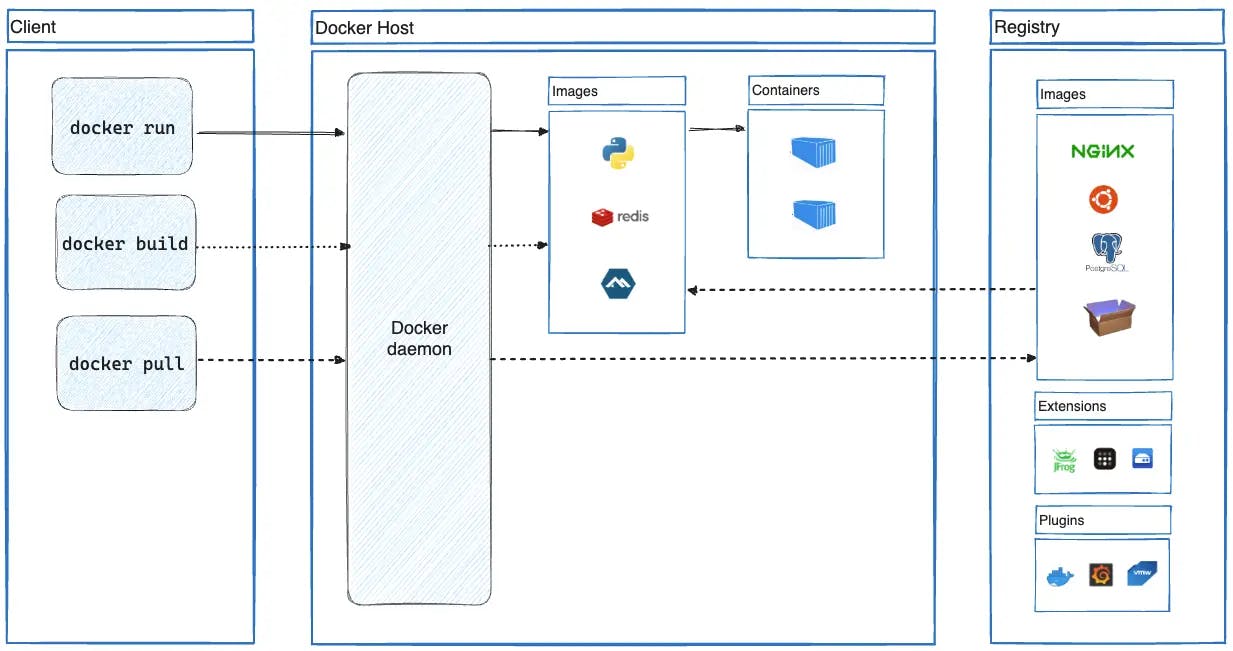
This image has been taken from this website.
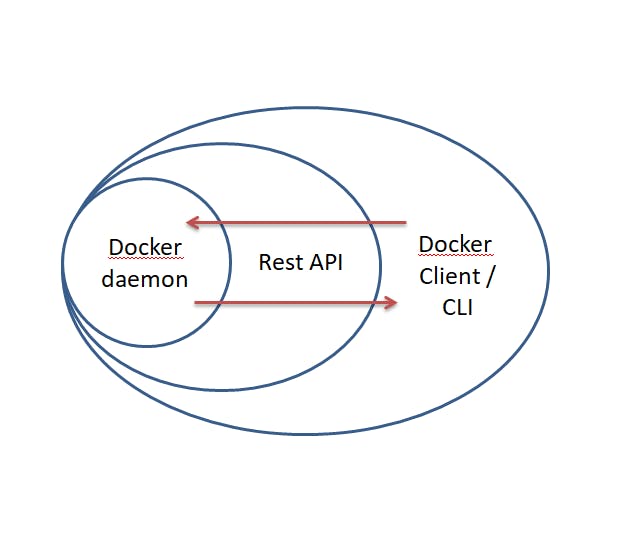
Docker follows a client-server architecture protocol to run commands like fetching images from the docker registry. The docker client and the docker daemon (server) communicate using REST APIs to do the heavy lifting of building, running, and distributing your Docker containers.
So let's deep dive into each of its components.
Docker runtime
It helps us to communicate with the containers using commands. Types of runtime it has...
runC - It is a command line tool that executes commands (starting and stopping the containers) and manages them according to the OCI (Open Container Initiative) standards. To learn more about runC refer to this blog.
containerd - It's another runtime that manages runC and containers. It is a CNCF project. It most importantly connects the client to the network and helps in pulling docker images. Some commands can be "docker build", "docker pull", etc. "containerd" also acts as a container runtime for kubernetes.
Docker Engine (Docker Daemon)
Docker engine also known as docker daemon communicates with the client by listening to it for any Docker API requests. It manages Docker objects such as images, containers, networks, and volumes.
"dockerd" is a long-time running process of the server daemon.
Docker Client
This is where the users can communicate with the server docker daemon. The client makes use of the docker runtime to execute commands like "docker run" with the help of the APIs. The Docker client can communicate with more than one daemon.
Docker registry
It is a public registry that contains various different docker images. It is most preferably called the Docker Hub. It is where one can pull images from or push them into it.
Docker Host
After one has pulled the images by the daemon, they are stored in the local system called the docker host. These images get ready to be containerized and delivered to the client.
Dockerfile
A Dockerfile is a text file that contains instructions for creating a Docker image. It defines the procedures required to construct an image that will serve as the foundation for operating Docker containers in a declarative and reproducible manner.
A Dockerfile describes the image's desired state.
Here are some major components and instructions that are typically present in a Dockerfile:
Base Image: The Dockerfile begins with the specification of a base image, which acts as the foundation for the new image. It could be a Docker official image or a custom image built on top of another base image. Mostly it is a linux based image. The "FROM" instruction initializes the base image.
Instructions: Dockerfile instructions specify the image's desired configuration and behaviour. Some examples of regularly used directions are:
RUN: Runs a command during the build process to install dependencies, configure the environment, or carry out additional tasks.
COPY: This command copies files from the host system to the image.
ENV: Sets the image's environment variables.
WORKDIR: Defines the working directory for the next steps.
EXPOSE: Notifies Docker that the container will be listening to a port number during runtime.
CMD: Specifies the container's default command or entry point to run when the container starts.
Layering: Each Dockerfile instruction adds a new layer to the image. Layers are cached, allowing subsequent builds to reuse previously produced layers if the instruction and context remain unchanged. This caching approach speeds up and improves the efficiency of the build.
After creating a Dockerfile, it is run using the "docker build" command to make the final Docker image. The generated image can then be executed as a Docker container, providing an isolated and reproducible runtime environment for the application or service encapsulated within it.
This is an example of a dockerfile..
FROM node:14
WORKDIR /app
COPY package.json .
RUN npm install
COPY . ./
ENV PORT 3000
EXPOSE $PORT
CMD ["npm", "start"]
docker build -t node-app:3.2 .
Docker image
It is an outcome of a docker file and acts as a blueprint to create a docker container.
A Docker image is a small, standalone, and executable software package that includes the code, runtime, libraries, tools, and system dependencies required to run a piece of software. It functions as a model for building Docker containers.
Docker images are built in layers. Each layer in a Docker image corresponds to a different modification or command from the Dockerfile. Layers are immutable and cached, enabling effective reuse and reducing the amount of time needed to reconstruct an image. Docker won't download the layers if they already exist.
Each layer in the architecture used by Docker images builds on the one before it. They are stacked on top of each other. The layers of the image are used as a read-only filesystem when a container is formed from one, and a thin, writable layer known as the container layer is put on top to record any changes made during the container's runtime.
Docker images can be stored in registries like Docker Hub or private registries. They can be easily shared, version-controlled, and distributed across different environments, making it convenient to deploy and run applications consistently on different systems.
Private registries or registries like Docker Hub can be used to store Docker images. Applications may be distributed and run reliably across several platforms thanks to their ease of sharing, version control, and distribution across various environments.
Docker container
It is a running instance or an object of a docker image.
The Docker runtime engine creates containers from Docker images. A container inherits the filesystem, libraries, and parameters specified in the layers of the image when it is created. The container layer, a writable layer that is further included, enables any changes made during the container's runtime to be recorded separately from the original image.
Each container operates independently from the host system and other containers, creating a sandboxed environment. While sharing the same kernel as the host system, containers feature separate isolated processes, network interfaces, and file systems. Because of this isolation, processes running in one container won't have an impact on those running in another or on the host system.
Docker Compose
Developers may easily define and manage multi-container applications using the tool Docker Compose. By allowing the specification of numerous services, networks, and volumes within a single configuration file (YAML), it makes the orchestration of complicated application stacks simpler.
Docker Swarm
It is an orchestration tool for multiple docker containers. These containers called the nodes, join together to form a cluster. It enables the development and administration of a swarm of Docker nodes, creating a distributed infrastructure for large-scale container execution. The activities of the cluster of nodes is controlled by a swarm manager.
So if we look at docker from a DevOps point of view, the operations team have no idea about how the docker image was created from the dockerfile. The developer team sort of manufactures the app by creating a docker image and hands it over to the operations team. From there on, the ops team can work out on its scalability and maintenance.
Hands-on
To work around with docker, firstly we need to install docker desktop. Secondly, we have to open up our terminal. Head over to this docker website and follow the step-by-step procedures to download docker desktop for your respective operating systems. Make sure to enable virtualization in your local systems before installing docker desktop.
After the installation, this is what docker desktop looks like when opened for the very first time.
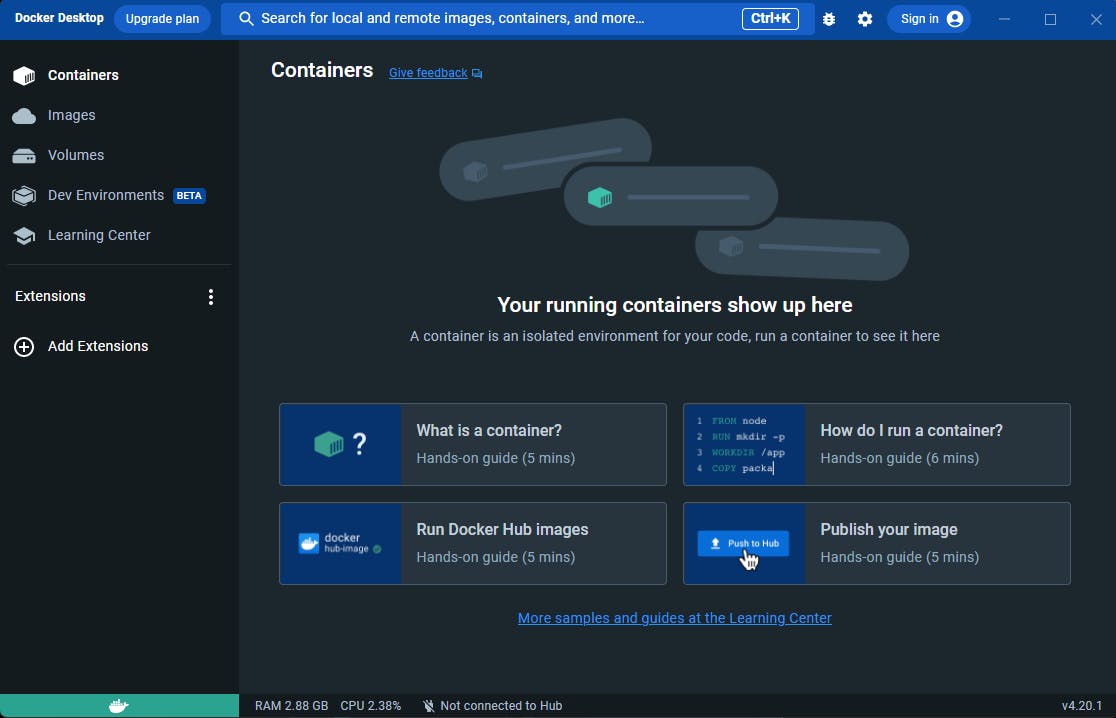
The version of docker can be checked by simply typing..
docker version
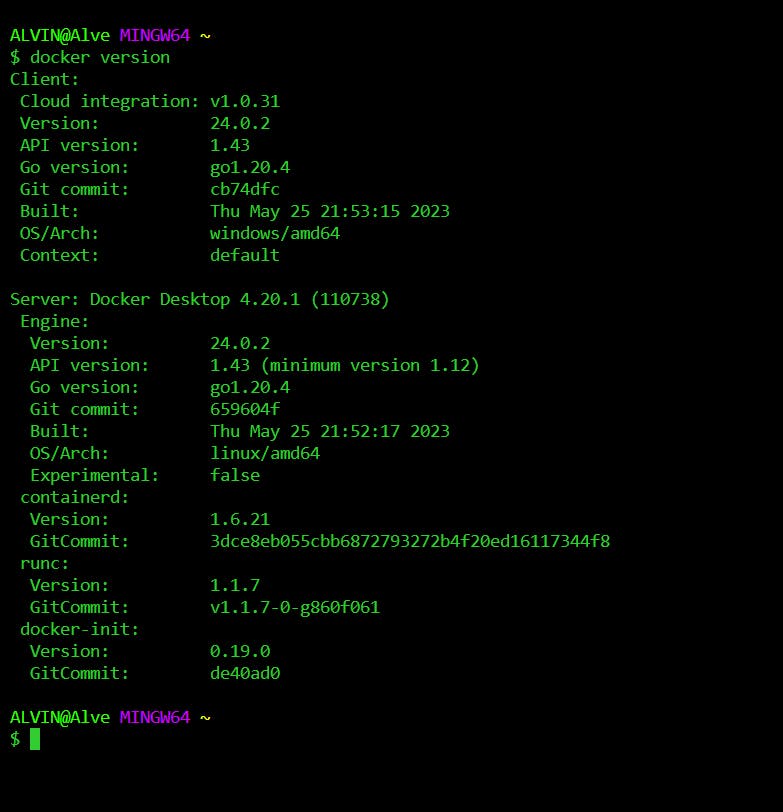
This makes sure that docker is installed on your system. So let's get started with something simple!
docker run hello-world
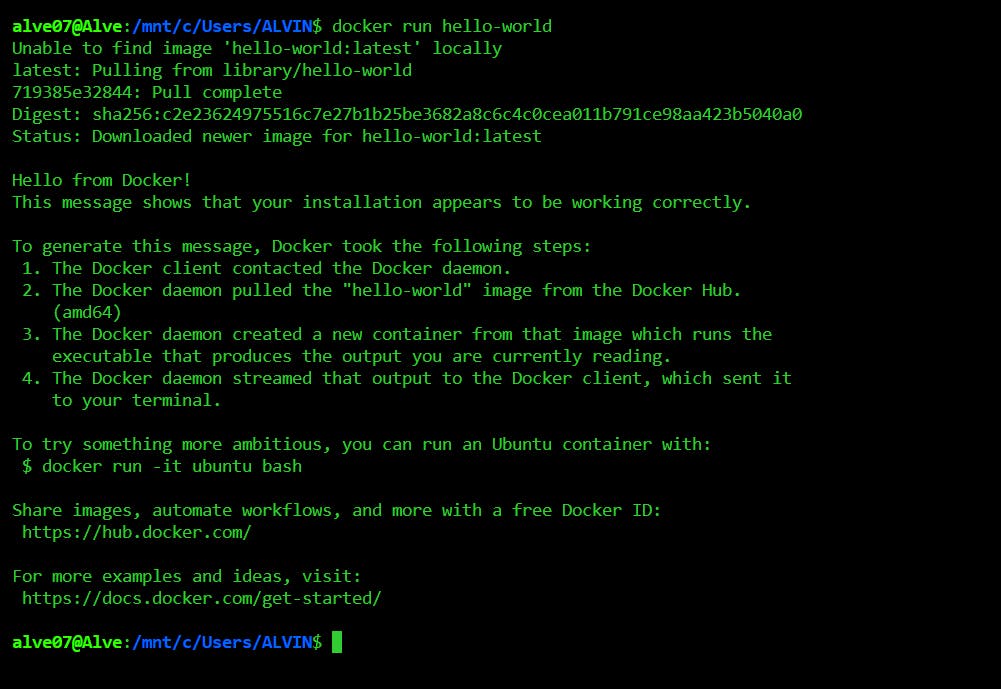
So what we did over here was basically a test drive to check if everything is working perfectly.
As soon as we entered the command "docker run hello-world", docker daemon checked whether the image already exists in the local system (docker host). Since we didn't have it, the image was downloaded or pulled (as mentioned in the terminal) from docker hub (docker public registry). Then, immediately a container was created by docker daemon for us to view what was in it.
It was nothing but a simple piece of text displaying greetings from Docker.
If we run the command for the second time, docker daemon won't pull the image from the hub because it already exists in our local system.
Let's download an ubuntu image.
docker run -it ubuntu

"-it" tag allows us to indulge ourselves in an interactive environment within the present container. It won't exit us out of it unless specified explicitly using the "exit" command.
Here "root@a1427c4886f7" means you are signed in as the default root user with the container ID a1427c4886f7.
But, what is this "Digest: sha256:6120be6a....." ?
We know already that a docker image is made up of layers. For the purpose of uniquely identifying and confirming the integrity of Docker images and their layers, the SHA-256 hash technique is employed. In particular, Docker creates a digest for the entire image as well as each image layer using the SHA-256 hash algorithm.
A cryptographic hash function called SHA-256 generates a fixed-size hash value of 256 bits from any input. Since it is thought to be very safe and collision-resistant, it is extremely improbable that different inputs will result in the same hash value.
A specified set of files, folders, and metadata are present in each layer and they all contribute to the total image content. Each layer's content is hashed with SHA-256 during the construction of a Docker image, and the resulting hash value is saved as part of the layer information. These hash values act as the specific identifiers for every layer, allowing Docker to quickly decide if a layer has to be rebuilt or may be retrieved from cache while pulling an image from the hub.
The SHA-256 hash of the image and its layers is also used to check the accuracy of the sent data when pushing or downloading Docker images from a registry. To make sure the image hasn't been altered or distorted during the transmission, the receiving end computes the hash of the downloaded file and compares it with the predicted hash.
Let's do some further investigation.
docker images -q --no-trunc
docker images

By executing the above commands, we can see how many images we have. Also, we got their image digests.
If we look closely, each image has been identified with an image ID which turns out to be the first 12 characters of the SHA256 hash digest of the respective image.
An image can be downloaded without running it. It pulls the default tag: latest unless a version is mentioned. Let's say we want the ubuntu version "23.10".
docker pull ubuntu:23.10

Now, if we spin up our images you'll see that we have two versions of ubuntu, one is the latest another is the "23.10" one.
docker images

Now let's talk about container isolation.
Let's open a new tab on the terminal while leaving the Ubuntu container running on the previous tab.
If we type the following command on both these tabs, we will see a difference between them.
ps aux

We see that the processes listed in each of these tabs aren't the same. This proves that a container has no idea of what is happening outside of it. It is completely isolated from the host operating system and other containers.
We can check the present container processes running or list out the containers that are running.
docker ps
docker container ls
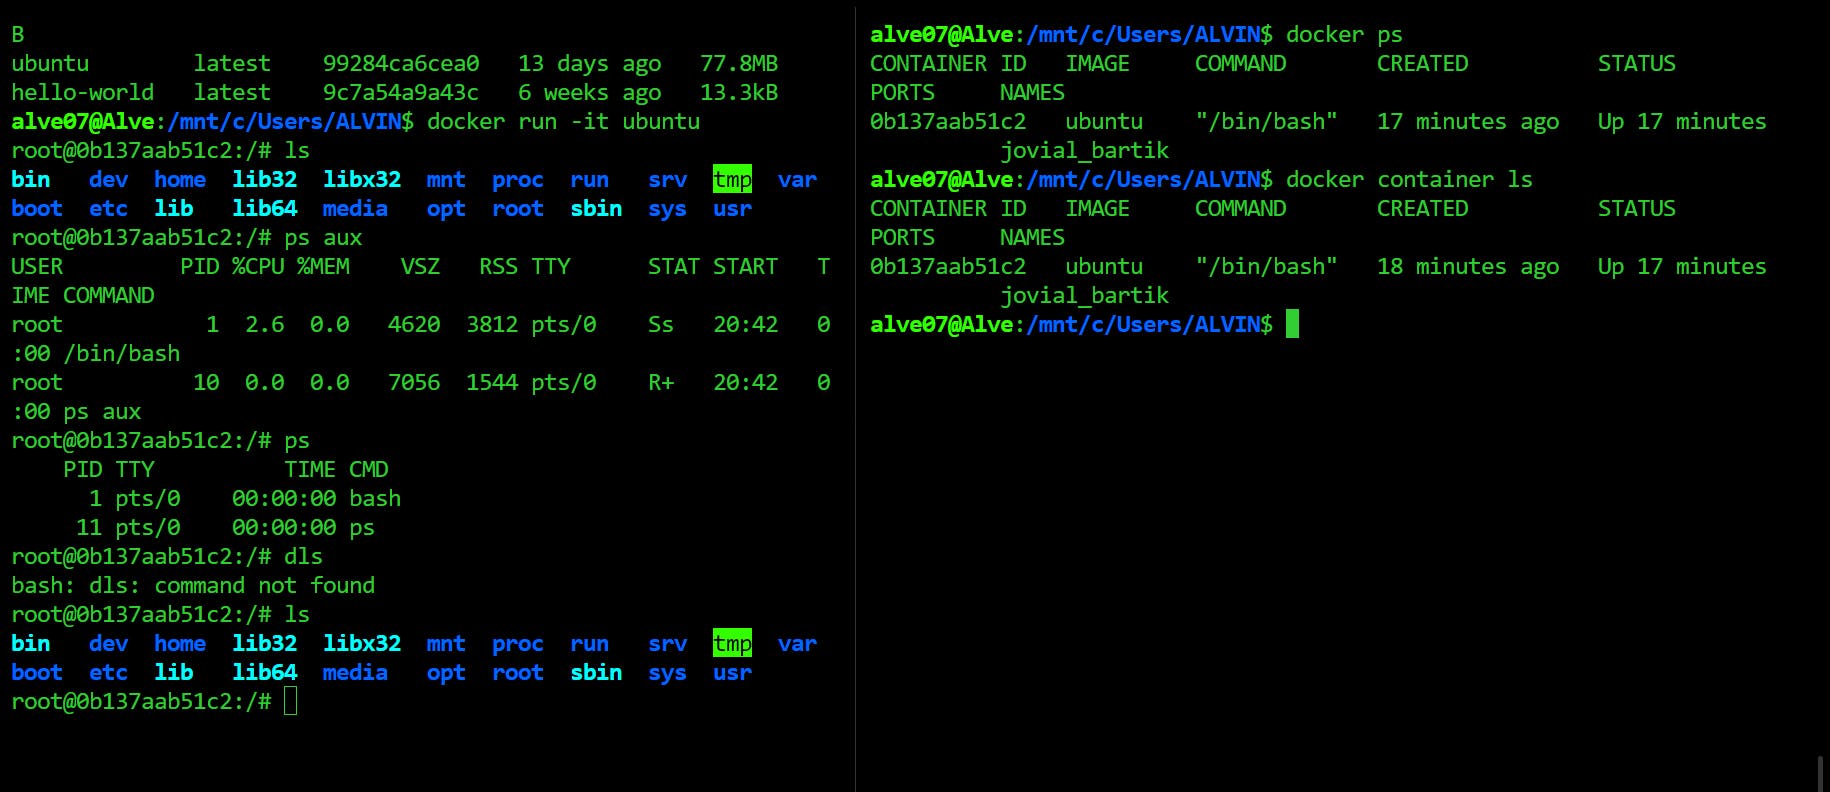
A container can be attached to an interactive shell by tapping into the container ID. It is like creating two instances of the container. But ultimately, it is the same container you are working on. To prove this, let's perform the following task.
Let's say we have an ubuntu container running on the left tab of the terminal. And then in that container we create 3 files named Hello.txt, How_Are_You.txt and Bye.txt. It is safe to say that in the background, ubuntu container is running.
On the right tab of the terminal, type the command to open up an interactive bash shell of the running container.
docker exec -it <Container-ID-goes-here> bash
As mentioned earlier the container ID can be found after "root@" of the running ubuntu container.
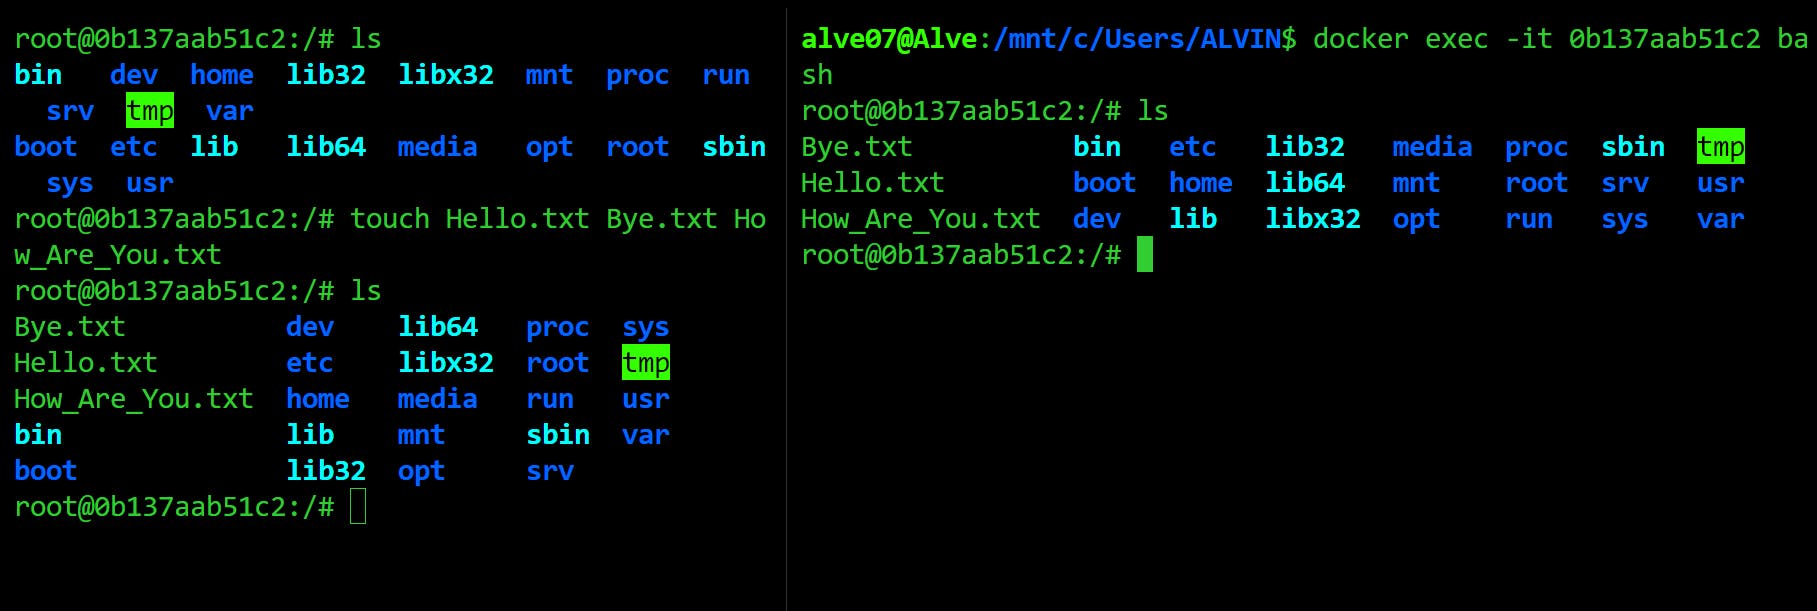
So, as soon as we see the prompt opening on the left terminal, let's list out all the files. You can see those 3 files being reflected here.
To stop a container, we can use the command..
docker stop <container-ID-goes-here>
Obviously, we have to run this command outside an already-running container to stop it.
To start it back again we can type..
docker start <container-ID-goes-here>
The 'docker run' command is used to create a container from an image, while the 'docker start' command is used to restart an existing stopped container.
To list out all the containers that are running and were created before, we have
docker ps -a

On the other hand, to list out the containers that are currently running, we have
docker ps

To remove a container, we have,
docker rm <container-ID-goes-here>
To extract the details of a docker image, we have
docker inspect <image-repository>
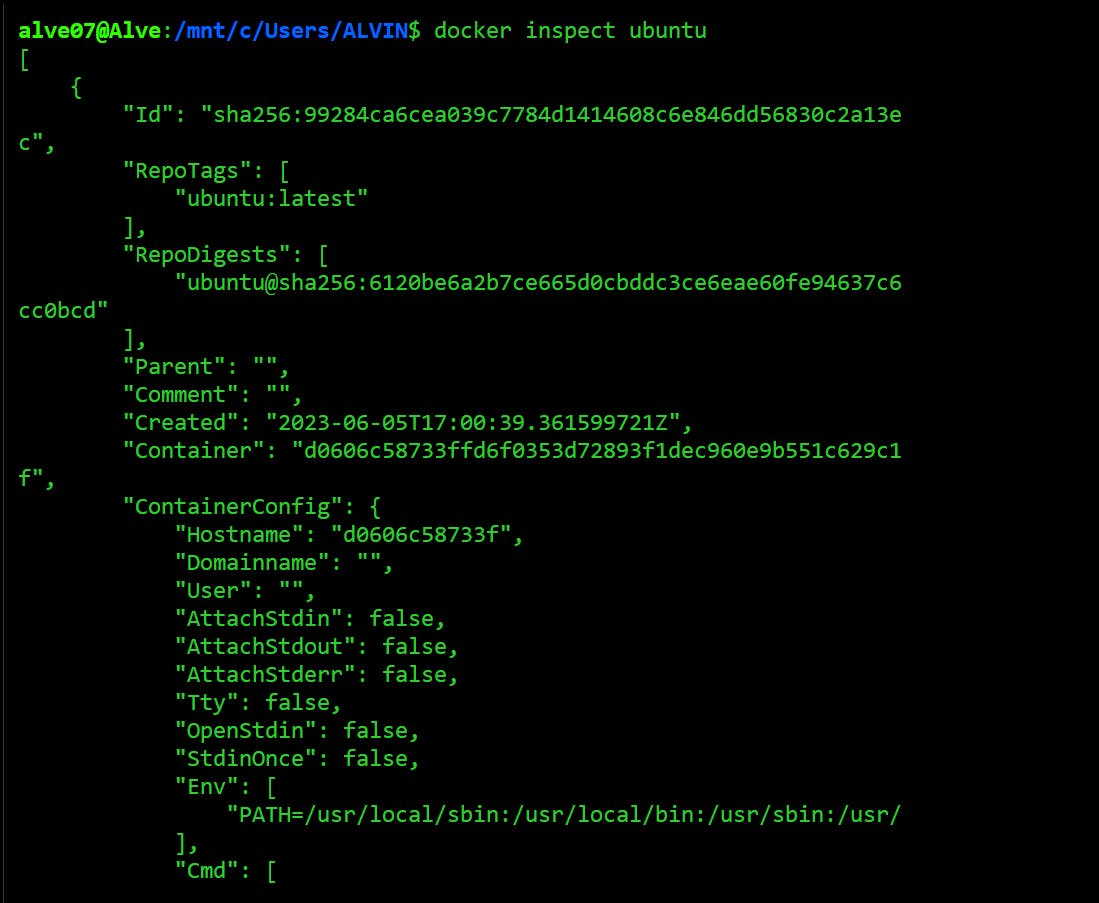
To retrieve the logs or say the history of commands executed by a container,
docker logs <container-id>
The reason why I am not mentioning the container ID is that every time you spin up a container, you'll get a different container ID which will totally differ from mine.
So, let's say I execute my logs.
docker logs 0b137aab51c2
My terminal replies to me with these logs of the three files that were recently created.
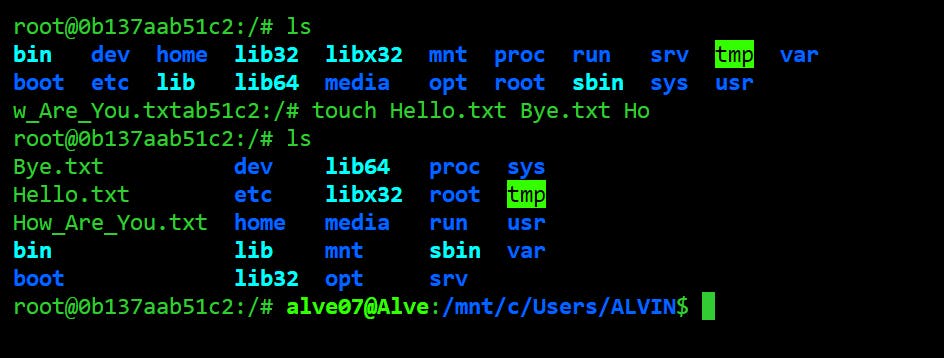
Now we may get fed up with the container IDs as they are not that easy to remember. No worries! We can name them as we want.
docker run -d --name linux-ubuntu ubuntu

Now say, for example, we want to delete this ubuntu container. No need to type in the container ID anymore. Just replace it with the container name.
docker rm linux-ubuntu
The stopped containers can be deleted at once using this command..
docker container prune -f
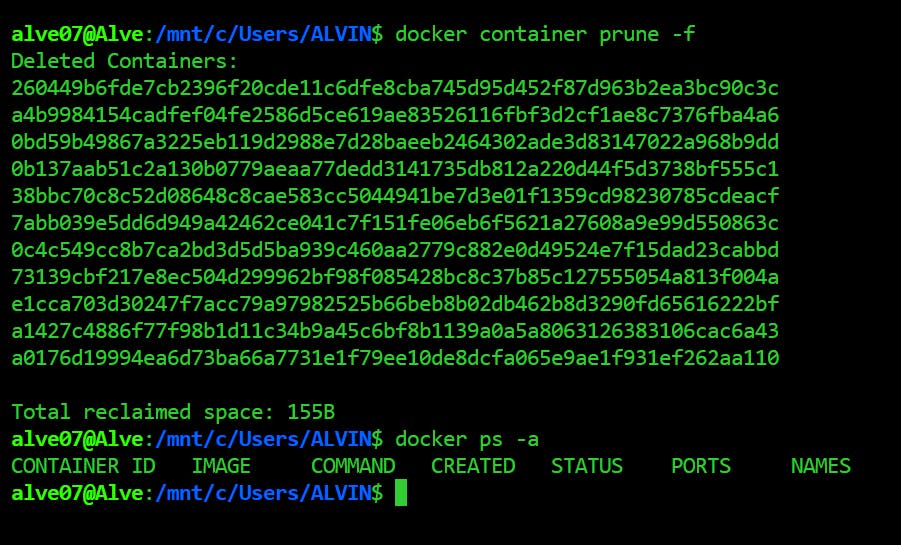
Now, if you'll check the containers using the command "docker ps -a", you won't find any.
We can also extract the container ID..
docker run -d ubuntu
'-d' simply means running the container in detached mode.

Let's say we want to run a Linux command with the help of the "ubuntu" image.
docker run ubuntu echo Wassup?

A docker image can be deleted using this command..
docker rmi hello-world -f

If we want to look at the IDs of the images, we have
docker images -q

And to remove all the images at once we use the command..
docker rmi $(docker images -q) -f
Port forwarding using docker -
Docker containers have ports bound to them so that they can listen to any requests we want to communicate with the application running inside the container.
So just to have a quick view of ports, let's pull the redis image from the hub and run it. And then display the running containers on a new tab.
docker run redis
docker ps

So the currently running container of the redis image is listening to port 6379. Now let's bind our local system's port with that of redis. Then display the running container.
docker run -d -p 3000:6379 redis
docker ps

As you can see, we have connected our local system host port 3000 to redis's port 6379 over TCP connection.
Let's take another example of nginx web server and access it locally while it is running as a container.
docker run -d -p 8080:80 nginx
Now head over to localhost:8080 on your browser.
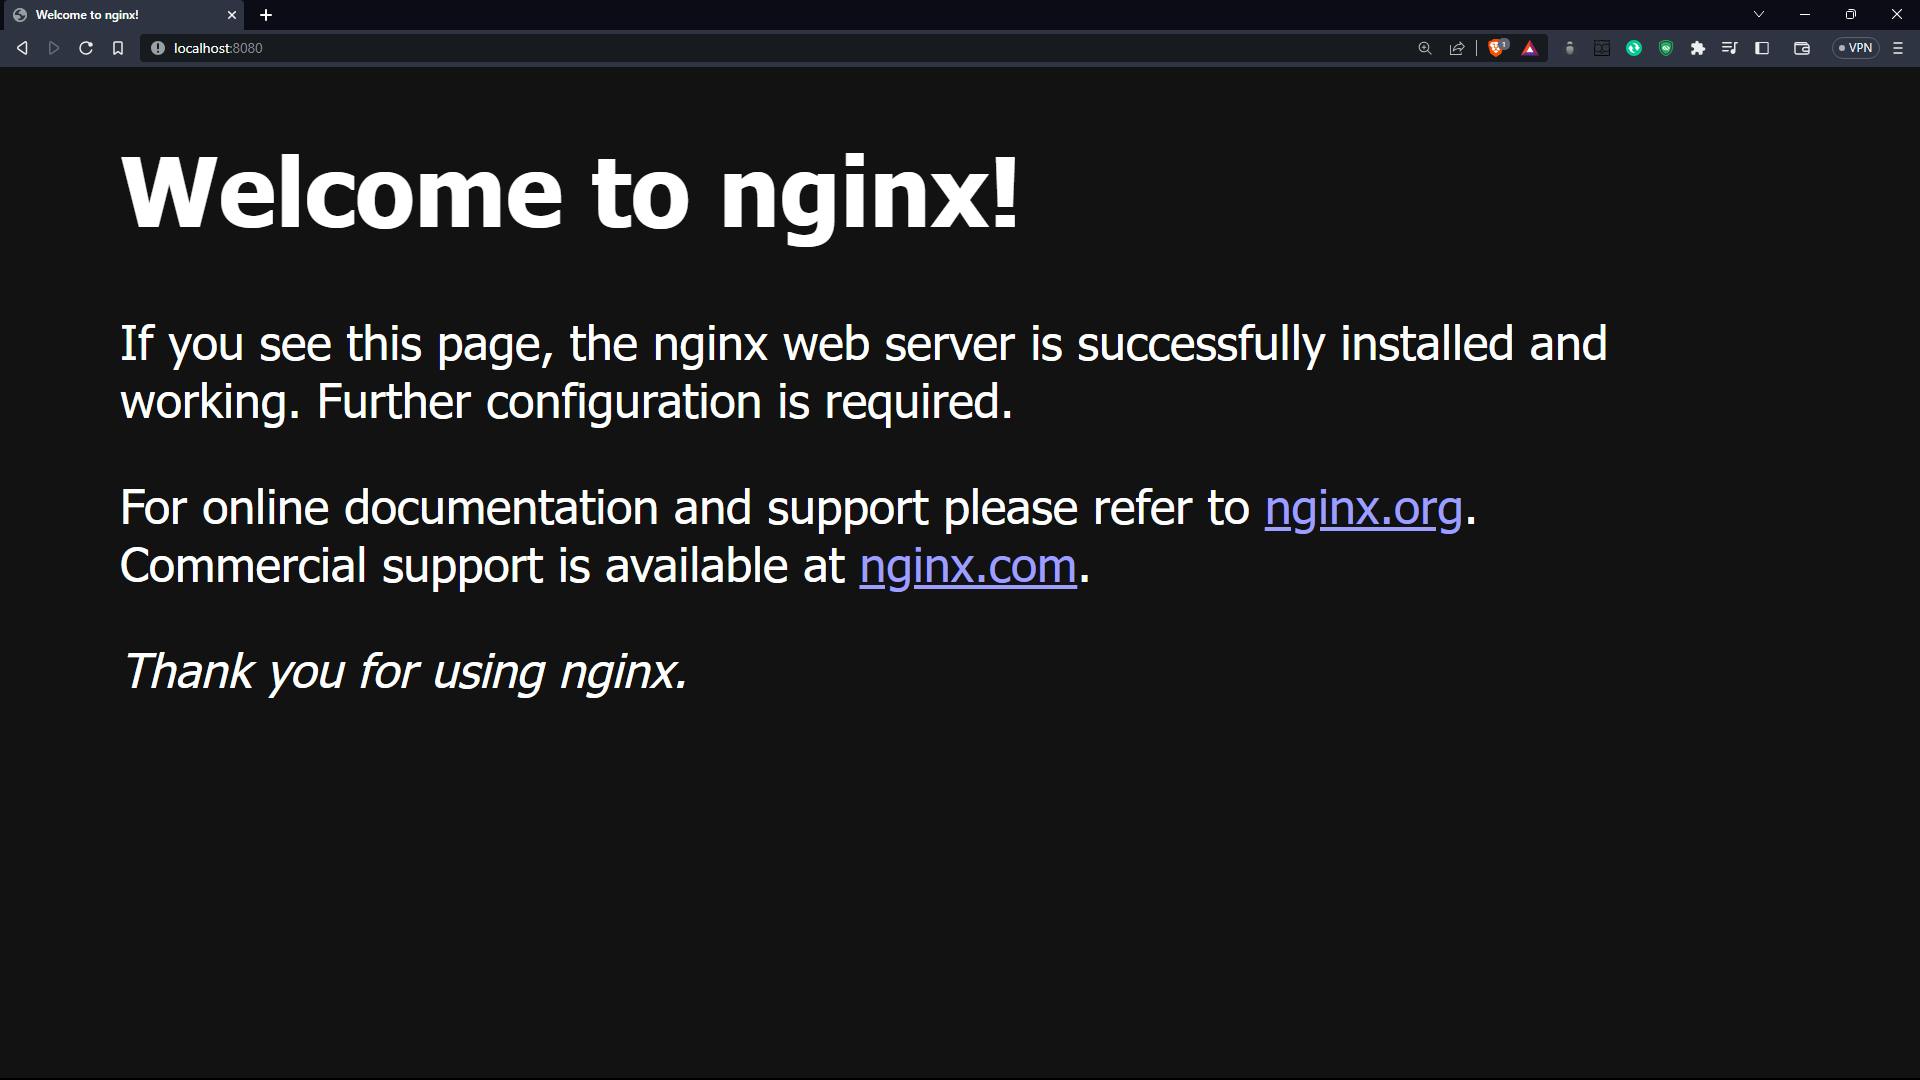
So what's happening over here? We can access nginx because of port forwarding. nginx listens to port 80. Basically, we are telling nginx to let us access it on our localhost:8080. Whatever data you have, pass it from port 80 to port 8080.
Meanwhile, if we have a look at our docker desktop, we can see that images and containers we have created so far have been reflected over here too!
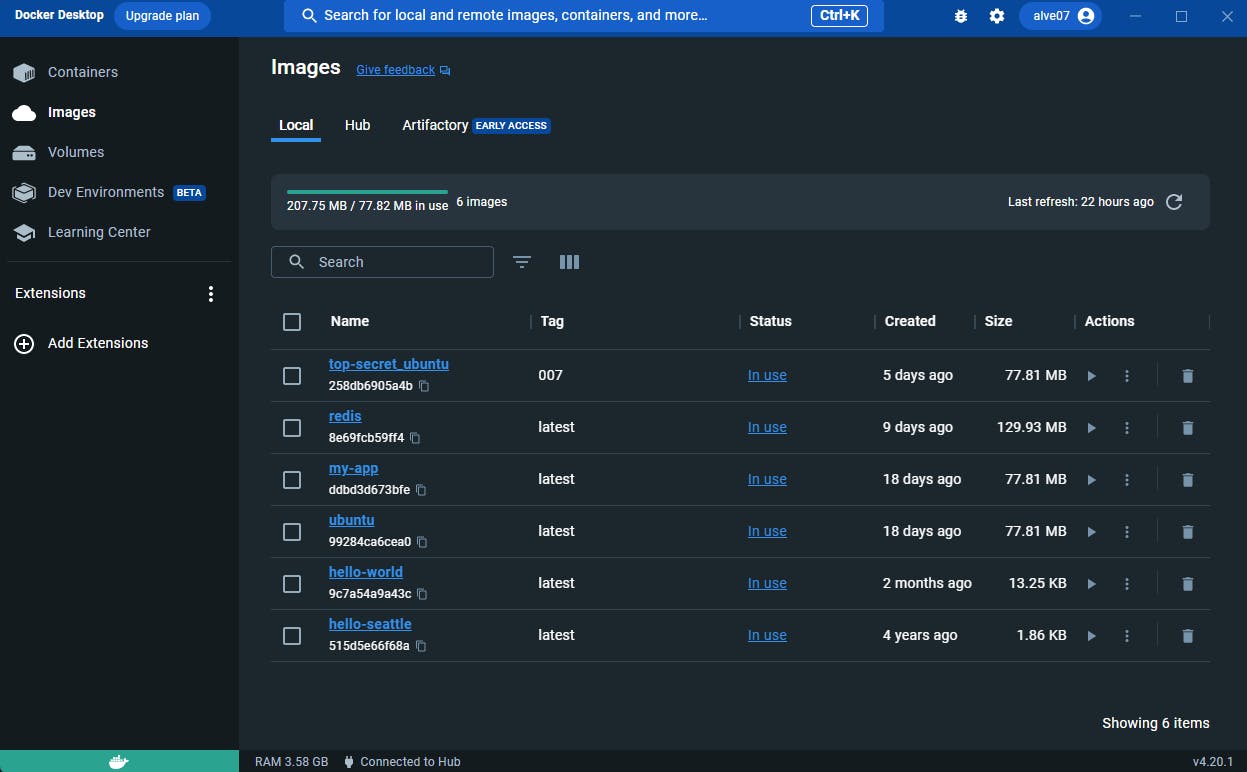
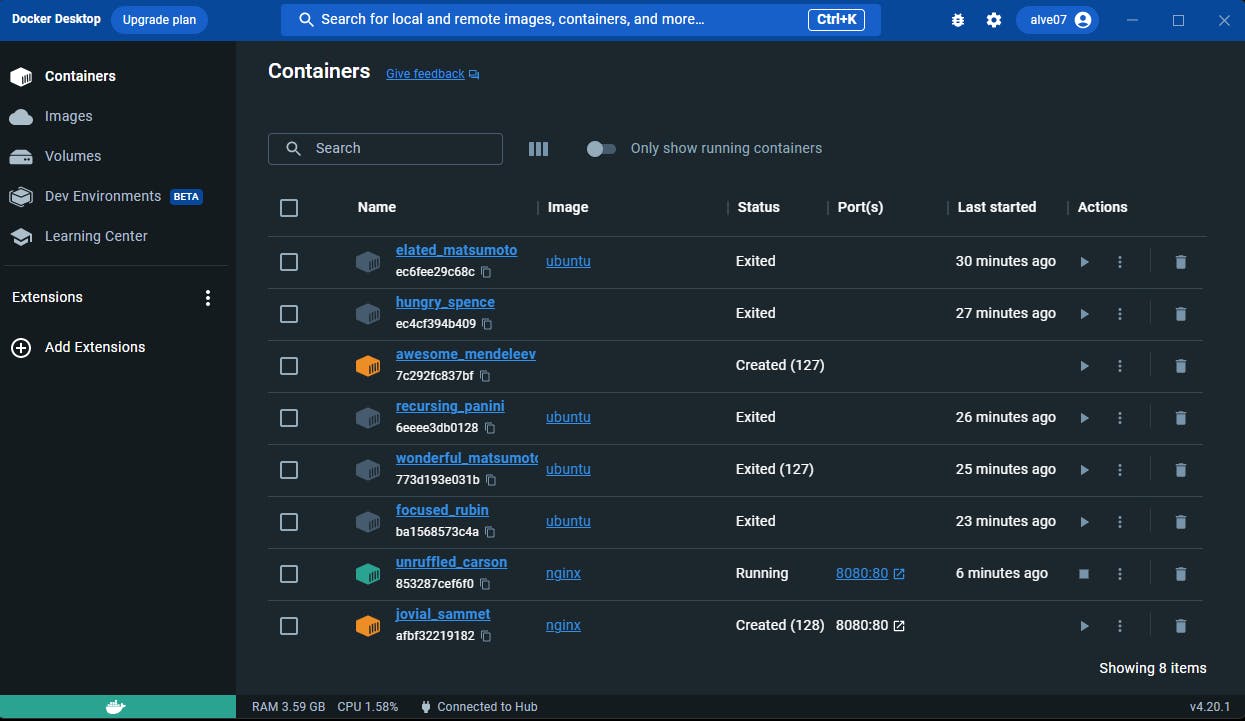
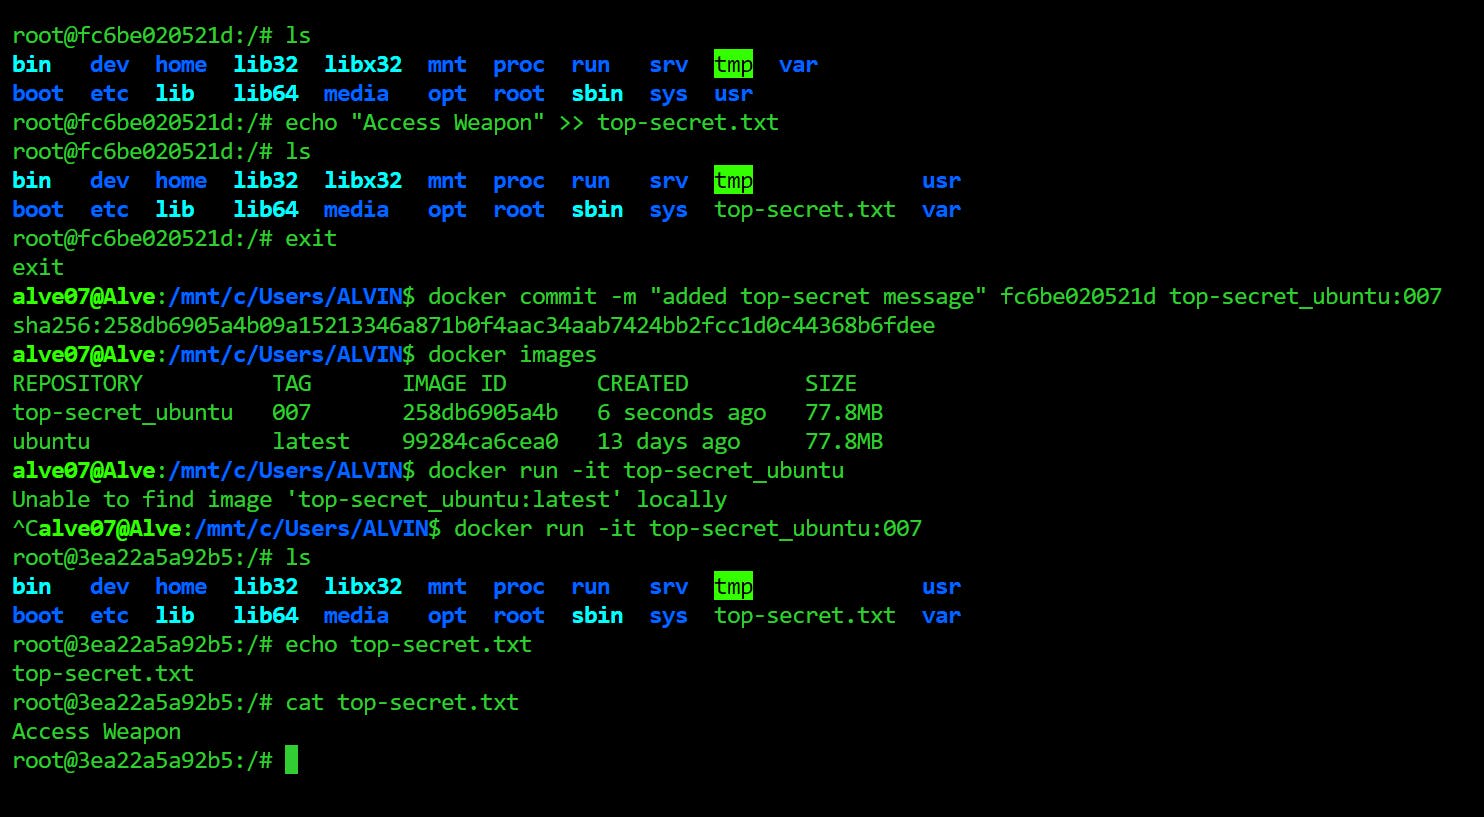
Now, what if we wanted to share an image to our friends that contains a special message like a top-secret one (just for the sake of an example).
Let's say we type in the message in a top-secret.txt file in an ubuntu image and exit out of it. Then we'll commit that container with a message to create a new image.
That image can be downloaded by another person. He can then tap into that image repository and display the message hidden inside the top-secret file.
docker run -it ubuntu
echo "Access Weapon" >> top-secret.txt
ls
exit
docker commit -m "added top-secret message" <container-ID> top-secret_ubuntu:007
docker images
docker run -it top-secret_ubuntu:007
ls
cat top-secret.txt
How to create your own image from a dockerfile and push to dockerhub?
Login to your docker hub account through your CLI.
docker login
Create a docker file with the name "Dockerfile" in an empty folder. Then add a base image "ubuntu" and a simple linux command "echo" in it.
 touch Dockerfile
 vim Dockerfile
Build the docker file with an image name in the current directory.
docker build -t my-app .
Check whether a new image has been added.
docker images
Run that image.
docker run my-app
Push that image to docker hub. First, tag the image name as <your-dockerhub-username>/<repository-name>. And then push that final image.
 # docker tag repo-name <your-dockerhub-username>/<repo-name>
 docker tag my-app alve07/my-app

 # docker push <your-dockerhub-username>/<repo-name>
 docker push alve07/my-app
Finally, when you check your docker hub account, you will be able to see that some changes have been reflected. Meaning, the image has been successfully pushed. Now anyone who wants to work on your image can pull it from there.
Wrap up
We learn't a lot of things starting from why docker came into existence, it's architecture, components, useful cases of docker all the way to running docker commands. Containers have really made it easy for developers from manufacturing an app to deployment and production.
So, docker containers are cool, aren't they?
References
What is docker? Introduction to containers - Kunal Kushwaha
Docker Tutorial for Beginners - TechWorld with Nana
